Getting Started with Krill
Install Krill, connect your first server, and create your first project in under 10 minutes.
Getting Started with Krill
This guide walks you through installing Krill and setting up your first automation project. You’ll go from zero to a working project with live data in about 10 minutes.
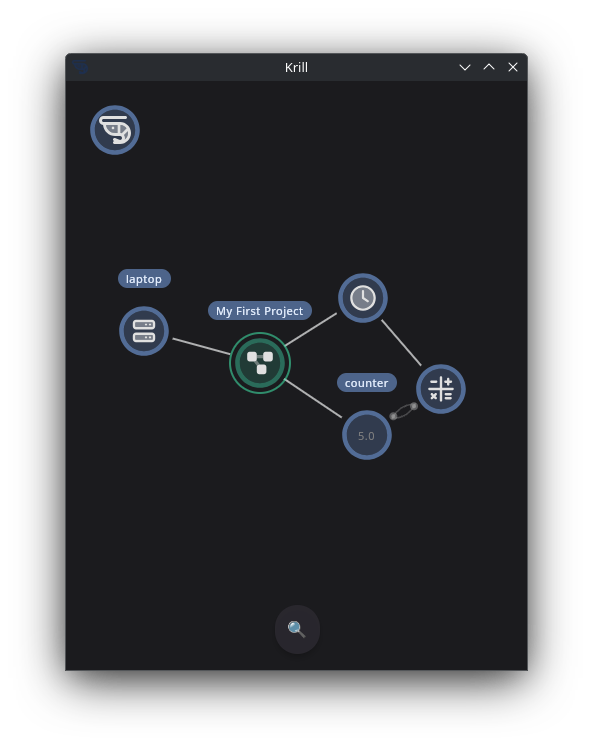
A simple example to help understand how Krill works is this simple swarm created with the desktop app. What is shown is:
- The Krill Avatar in the upper right you can interact with.
- Krill Server running on my ubuntu laptop which will appear automatically if you’re on the same network and have the same 4-digit PIN.
- A project called “My First Project” which is a container for organizing your automation created by clicking on the server node.
- A cron timer I set to run every 5 seconds.
- A data point called “Counter” that stores numeric values over time.
- A calculation node that simple reads the value of the counter and adds one.
Krill works by nodes performing a function and based on the result, executes child nodes or a configured taget node, which can be on the same server or a different server in the swarm.
There are over 30 node types avaible that can be connected over any number of servers in the swarm, from sending an email when a value is high to taking a photo based on a distance sensor.
1. Install the Server
On your Raspberry Pi or Debian-based Linux machine:
1
2
3
4
5
6
7
8
9
10
# Add the Krill repository
curl -fsSL https://krillswarm.com/apt/krill.gpg | sudo gpg --dearmor -o /usr/share/keyrings/krill.gpg
echo "deb [signed-by=/usr/share/keyrings/krill.gpg] https://krillswarm.com/apt stable main" | sudo tee /etc/apt/sources.list.d/krill.list

# Install
sudo apt update
sudo apt install krill

# For Raspberry Pi GPIO support, also install:
sudo apt install krill-pi4j
During installation, you’ll be prompted to set a 4-digit cluster PIN. This PIN secures all communication between servers and clients in your swarm. Remember it — you’ll need it when connecting apps.
The server starts automatically and listens on https://<hostname>:8442.
2. Install the App
Choose your platform:
- Android: Google Play
- iOS: App Store
- Desktop:
sudo apt install krill-desktop(Linux) or download from releases - Web: Open
https://<server-ip>:8442in your browser (accept the self-signed certificate)
3. Connect to Your Server
- Launch the app — you’ll see a welcome screen with terms of service
- Accept terms and proceed
- Enter the 4-digit PIN you set during server installation
- Your server appears automatically — the app discovers servers on your local network via UDP beacon
If your server doesn’t appear automatically, you can add it manually by tapping the shrimp avatar and selecting “Server.”
4. Create Your First Project
Once connected, you’ll see the swarm view — a force-graph visualization showing your server node.
- Click the shrimp avatar (top area) to open the add menu
- Select “Project” — this creates a container for organizing your automation
- Give it a name (e.g., “Living Room”, “Greenhouse”, “Aquarium”)
- Click Save — the project appears as a teal node in the swarm
Click the project node to open the Project Dashboard — a full-screen organized view of everything in your project.
5. Add a Data Point
Data Points store time-series values — temperature, humidity, pH, or any numeric/text/boolean value.
- In the Project Dashboard, click the shrimp avatar to open the add menu
- Select “DataPoint”
- Configure it:
- Name: “Temperature”
- Data Type: Double
- Unit: “°C” (optional)
- Precision: 1 decimal
- Save — the data point appears in the Data section of your dashboard
You can now manually enter values by clicking the data point’s row and using the input field. For automated data collection, connect a serial sensor, GPIO pin, or incoming webhook.
6. View Your Data
Click the data point in the dashboard to see its current value and history. You can add a Graph node to visualize trends over time:
- Click the shrimp avatar in the Project Dashboard
- Select “Graph”
- The graph automatically links to data points in your project
- Choose a time range (hour, day, week, month, year)
What’s Next?
Now that you have a working project with data collection, explore:
- GPIO Pins — Control relays, read sensors
- Serial Devices — Connect USB sensors (Atlas Scientific, CircuitPython boards)
- Logic Gates — Boolean automation (AND, OR, NOT, etc.)
- Cron Timers — Schedule recurring tasks
- MQTT Integration — Bridge to Zigbee, Home Assistant
- Project Diagrams — Custom SVG dashboards with live data overlays
- Camera — Live camera feeds from Raspberry Pi Camera Module
- Feature Roadmap — See what’s shipped, in progress, and planned
Adding More Servers
To add another Raspberry Pi to your swarm:
- Install
krillon the new Pi - Use the same 4-digit PIN during installation
- The servers automatically discover each other on the local network
- Nodes on any server can reference nodes on any other server
Last verified: 2026-04-03